How to install Nopixel 3.5 Full Server
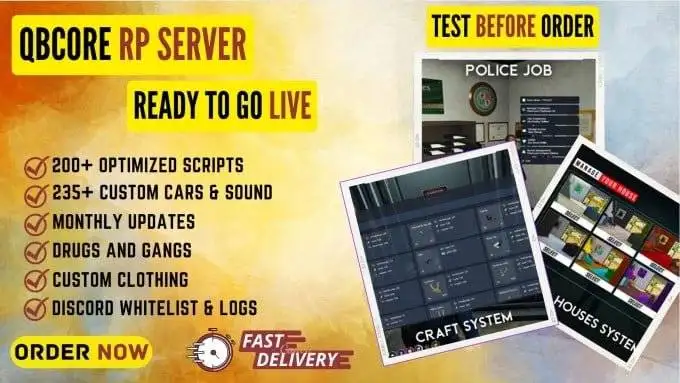
Discover the Ultimate NoPixel 3.5 Full Server for FiveM: Boost Your Gaming Experience Today with amazing nopixel server maps and mods!
Introducing our top-of-the-line NoPixel 3.5 Full Server Download, designed to provide an unparalleled FiveM gaming experience. This NoPixel New Server is based on the latest QBCore Framework and is fully optimized to handle over 500 players simultaneously on both OneSync Infinity and Legacy. With premium maps, custom scripts, vehicles, and EUPs, our FiveM NoPixel Server Files are perfect for those seeking an immersive role-playing environment.
Why Choose Our NoPixel 3.5 Server?
Our NoPixel 3.5 Server Files stand out among the competition, offering a plethora of unique features that require no additional developer support. Simply install it on your host, and you’re ready to invite players and start playing right away!
Not a Custom Core-based server, our package only includes pure, newer version QBCore compatible scripts. You’ll receive the base server identical to the Test server, which you can access after contacting us. We’ve thoroughly tested these servers for performance and features, ensuring they’re the ideal choice for premium, optimized FiveM experiences.

Incredible Features You’ll Love:
- Heavily inspired by NoPixel 3.5 with the latest QBCore Framework
- Over 20 Heists & Robberies and 6 types of drugs
- More than 60 Jobs & Activities, including Police, EMS, Mechanic, Car Dealer, etc.
- Enhanced Gang, Banking, Multiple Character & Spawning Systems
- Refined UI, Job grades/ranks with Boss menus
- Discord Integration, Rich presence (with Server Logs), and Anti-cheat
- New EmoteMenu featuring Custom Emotes & 3000+ Dances like NoPixel
Exclusive Assets for an Immersive Experience:
- Massive Clothing Pack with 15,000+ assets
- Upgraded CAYO PERICO Island
- Premium housing shells and Custom Job Vehicles
- 200+ Custom Vehicles (Including Premium Vehicles)
- And more, perfect for any serious RP!
For a complete list of features, visit our page: NoPixel Inspired QBCore Roleplay Server
Elevate your gaming experience with our NoPixel 3.5 Full Server Download today and become a part of the ultimate role-playing community on FiveM!
Windows Installation
How to install FiveM Server on Windows
Database Configuration

HeidiSQL
- Open HeidiSQL, click the green circle with the plus sign and name it something
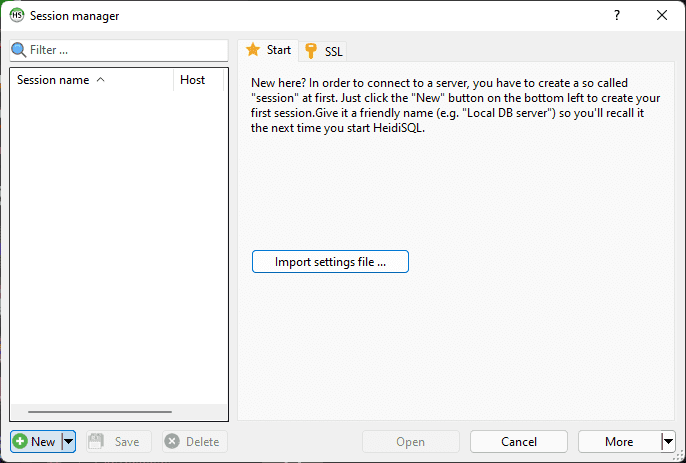
Press new to create a session
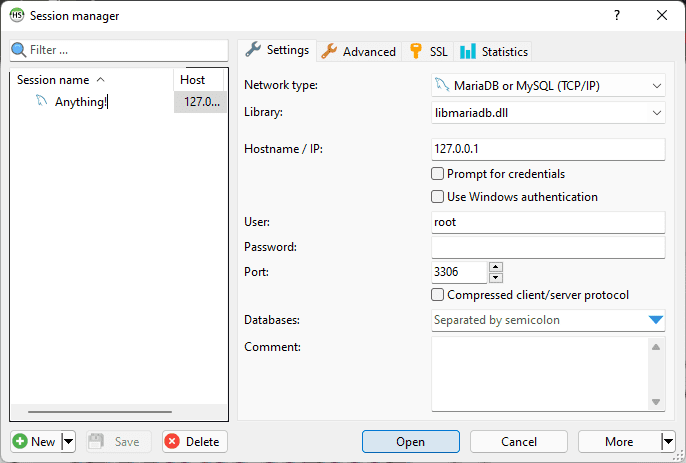
Rename this to whatever you’d like and press open
Artifact and txAdmin
Make a new folder on your desktop and name it whatever you want, download the latest recommended FiveM artifacts, then extract them to the folder you made
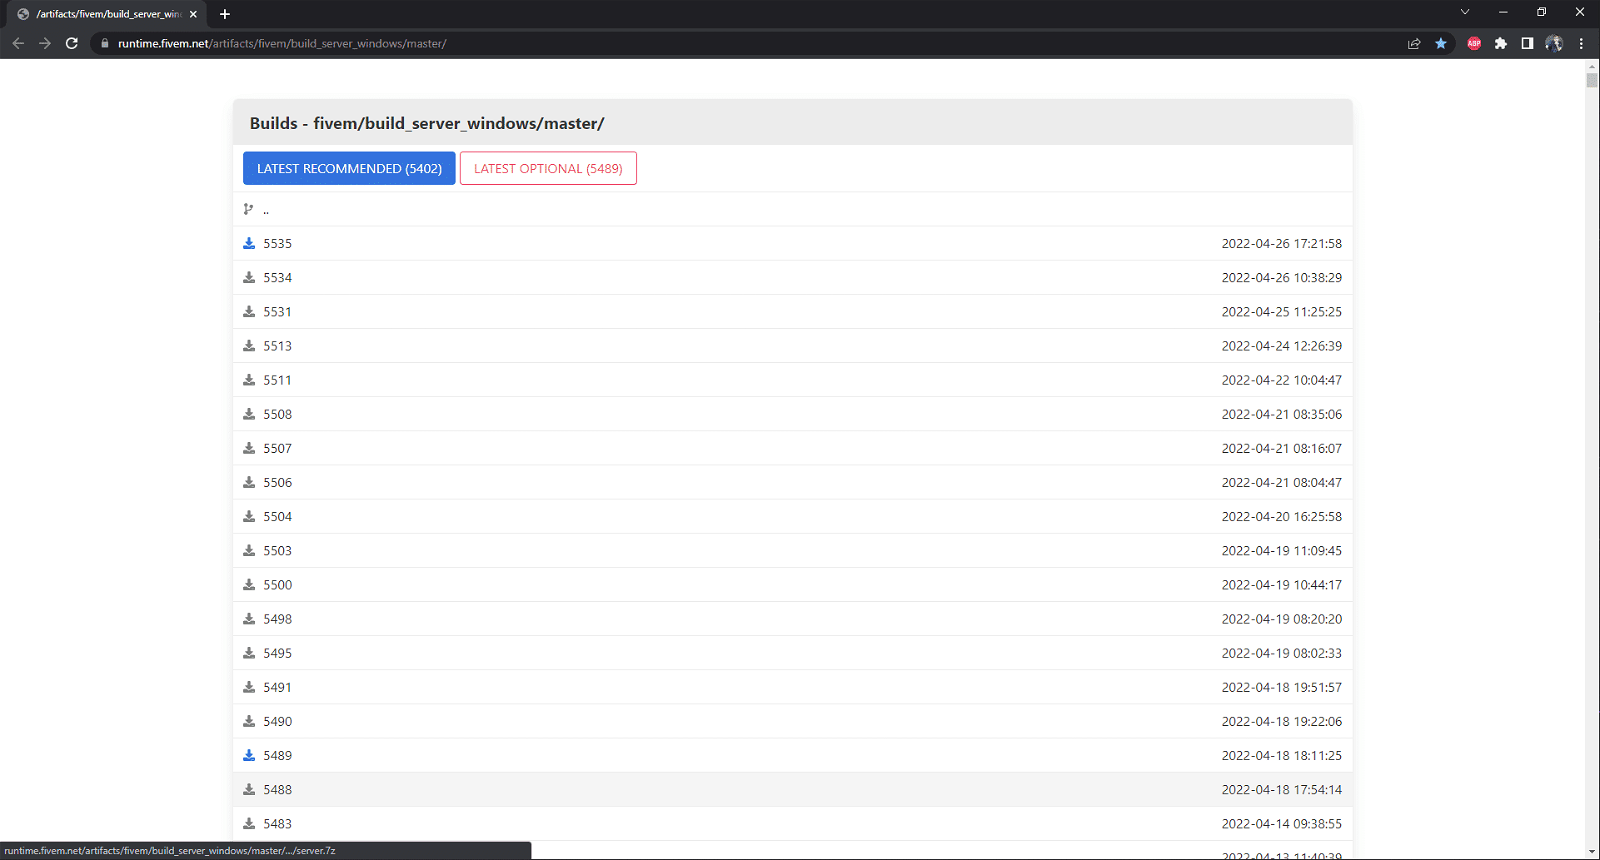
The webpage for downloading an artifact version
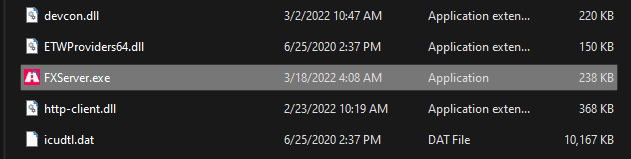
Double click on FXServer.exe to run it. Once loaded, it should open a web browser page
txAdmin is already bundled in with the FiveM artifacts so running the server starter will launch it
After you link your FiveM account, which it should do automatically, make a password. Then you will be greeted with step
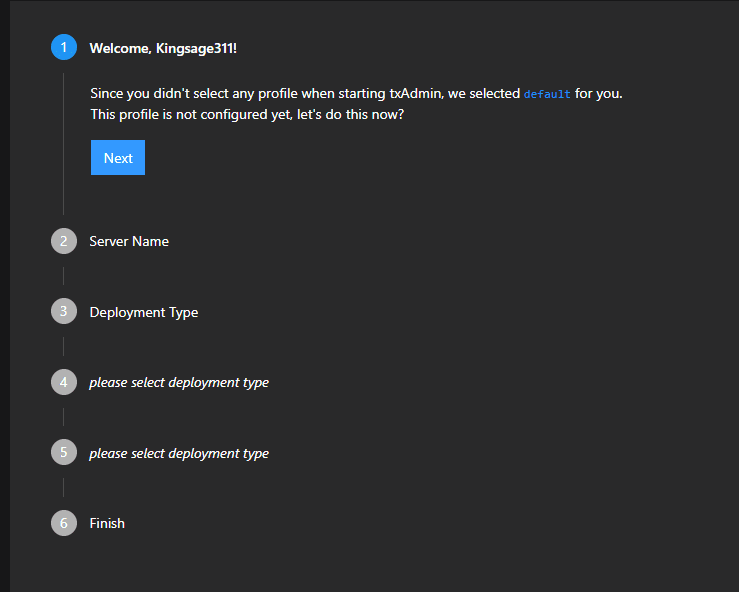
txAdmin starting page after logging in
When you get to step number 3, click “Local Server Data”
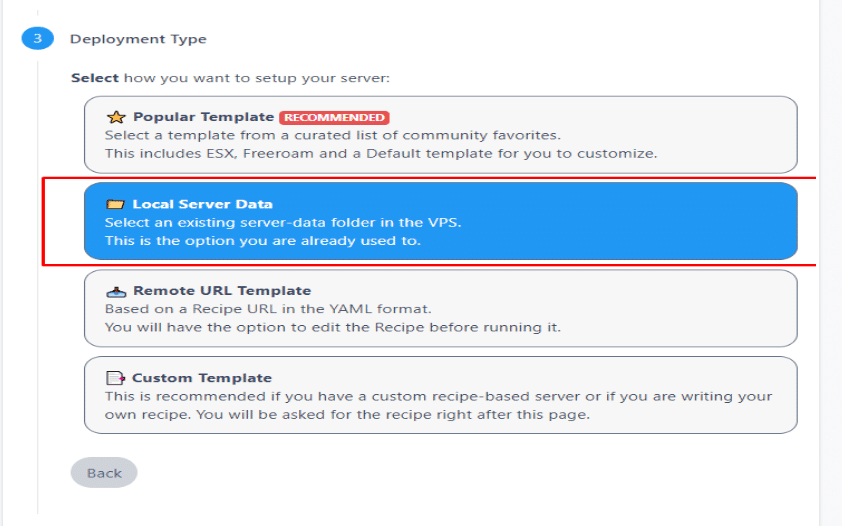
Choosing a deployment type
When you get to step number 4, put your server-data folder path and clock next two times.
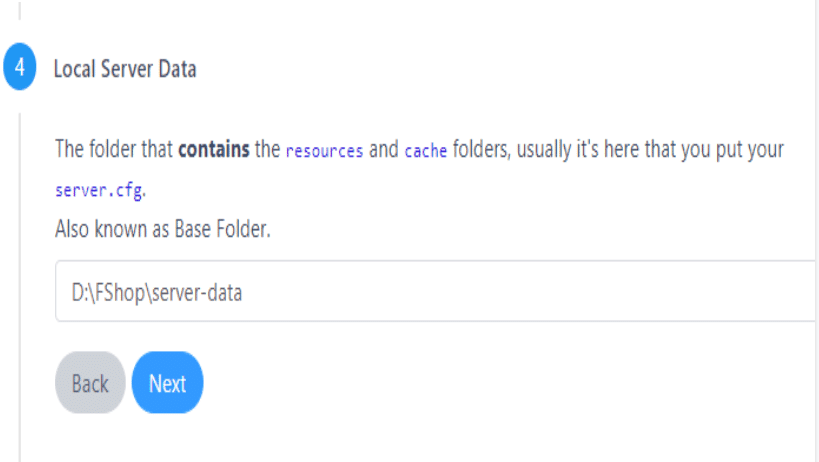
server-data path


Setting Permissions
Learn how to configure permissions on your new QBCore server! Nopixel 3.5 Full Server
Server Config
- At the bottom of your server.cfg file you will see a permissions section
## Permissions ##
add_ace group.admin command allow # allow all commands
{{addPrincipalsMaster}} # This is the way txAdmin assigns permissions to the server owner
# Resources
add_ace resource.qb-core command allow # Allow qb-core to execute commands
# Gods
add_ace qbcore.god command allow # Allow all commands
# Inheritance
add_principal qbcore.god group.admin # Allow gods access to the main admin group used to get all default permissions
add_principal qbcore.god qbcore.admin # Allow gods access to admin commands
add_principal qbcore.admin qbcore.mod # Allow admins access to mod commands
Different types of identifiers
- FiveM ID
- Rockstar license (what qbcore uses)
- Discord ID
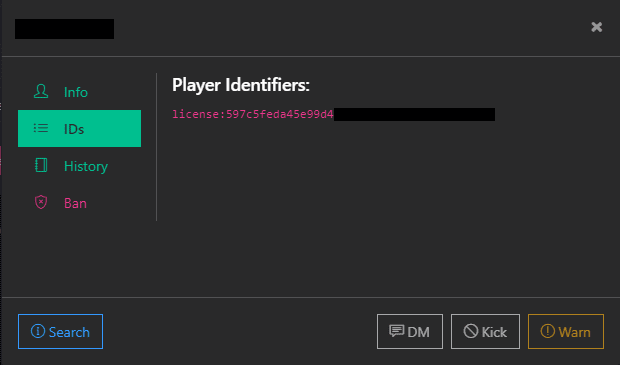
Players section as shown below## Permissions ##
add_ace group.admin command allow # allow all commands
{{addPrincipalsMaster}} # This is the way txAdmin assigns permissions to the server owner
# Resources
add_ace resource.qb-core command allow # Allow qb-core to execute commands
# Gods
add_ace qbcore.god command allow # Allow all commands
# Inheritance
add_principal qbcore.god group.admin # Allow gods access to the main admin group used to get all default permissions
add_principal qbcore.god qbcore.admin # Allow gods access to admin commands
add_principal qbcore.admin qbcore.mod # Allow admins access to mod commands
# Players
add_principal identifier.license:xxxxxx qbcore.god # Player Name
add_principal identifier.license:xxxxxx qbcore.admin # Player Name
add_principal identifier.license:xxxxxx qbcore.mod # Player Name
Setting users permissions in the server
While you have permissions you can set users permissions either using commands or the admin menu
Setting permissions using the command
- While in the server type in the command
/addpermission [id] [addpermissions] - It will look something like this
/addpermission 1 god
Setting permissions through the admin menu
- In chat enter the command
/admin - Access the “Player Management” tab and select the player you want to give permissions to
- Locate a menu item called “Permissions”
- Set the user group for that user then press “submit”
Allowing commands to specific permissions
In qb-core/config.lua find QBConfig.Server.Permissions = {'god', 'admin', 'mod'}
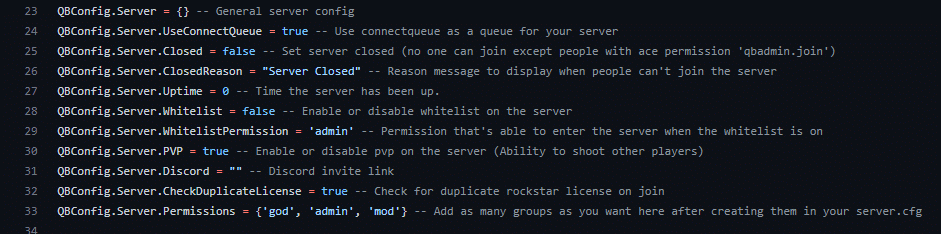
Located at the bottom of this picture
QBConfig.Server.Permissions = {'god', 'admin', 'mod', 'leo'}add_principal identifier.license:xxxxxxx qbcore.leo #players nameQBCore.Commands.Add('spikes', 'Place spike strips', {}, false, function(source)-- Run codeend, 'leo')add_principal identifier.license:xxxx qbcore.leo and now that command will be restricted to only those with that permission as well as remove the chat suggestion for anyone without this permission! Imagine if you used this when setting a players job or when a player clocked in/out to dynamically remove the permission. This also completely eliminates the need to ever check job permissions on a command like this because the command itself will already be restricted (Nopixel 3.5 Full Server)Script Optimization
Learn how to write optimized code!
General Practices
- Localize as many functions and variables as possible. Lua can read them faster
myVariable = false -- Don't use this
local myVariable = false -- Use this
function someFunction() -- Don't use this
print('Im a global function!')
end
local function someFunction() -- Use this
print('Im a local function!')
end
- Instead of using
table.insertusetableName[#tableName+1] = data
function someFunction()
local table = {}
table.insert(table, {}) -- Don't use this
table[table+1] = {} -- Use this
end
- Instead of using
if something ~= niluseif something then. This method checks for nil and/or false at the same time
function someFunction()
local bool = nil
if bool ~= nil then -- Don't use this
print('bool was not nil but also could be false!')
end
if bool then -- Use this
print('bool was neither nil or false!')
end
end
- If you are creating a function or an event, make it so that it can be used in different scenarios with different variables. Keep it universal basically
local function someFunction(param1, param2, param3)
print('Im a function that accepts 3 parameters which allows for multiple conditions!')
if param1 == 'something' then
print('I met condition number one!')
elseif param2 == 'somethingelse' then
print('I met condition number two!')
elseif param3 == 'somethingelsemore' then
print('I met condition number three!')
end
end
RegisterNetEvent('someEvent', function(param1, param2, param3)
print('Im an event that accepts 3 parameters which allows for multiple conditions!')
if param1 == 'something' then
print('I met condition number one!')
elseif param2 == 'somethingelse' then
print('I met condition number two!')
elseif param3 == 'somethingelsemore' then
print('I met condition number three!')
end
end)
- When writing code use what’s known as “short returns” for failed conditions
local function someFunction(param1, param2, param3)
if not param1 then return end
print('I met condition number one!')
if not param2 then return end
print('I met condition number two!')
if not param3 then return end
print('I met condition number three!')
end
Native Usage
- Always replace
GetPlayerPed(-1)withPlayerPedId()
local function someFunction()
local ped = GetPlayerPed(-1) -- Don't use this
local ped = PlayerPedId() -- Use this
end
- Always replace
GetDistanceBetweenCoordswith lua math aka#(vector3 - vector3)
local function someFunction()
local ped = PlayerPedId()
local pCoords = GetEntityCoords(ped)
local coords = vector3(-29.53, -1103.67, 26.42)
local dist = GetDistanceBetweenCoords(pCoords, coords, true) -- Don't use this
local dist = #(pCoords - coords) -- Use this
if dist > 5 then
print('Im within 5 distance units of the coords!')
end
end
Loops
- Control your while loops and when they run
local function exampleLoop()
CreateThread(function()
while listen do
print('running while loop only when needed')
Wait(1)
end
end)
end
local listen = false
CreateThread(function()
LoopZone = CircleZone:Create(vector3(-851.63, 74.36, 51.86), 5.0, {
name = "ExampleLoop",
debugPoly = true,
})
LoopZone:onPlayerInOut(function(isPointInside)
if isPointInside then
listen = true
exampleLoop() -- Initiate loop
else
listen = false -- turns off when your outside the zone
end
end)
end)
- If you do have to create a thread that includes a “while” loop, always avoid using “while true do” if able. If you have to use this, follow the next tip, and it won’t impact performance as much
- Control your thread times by using a variable that changes the wait time retroactively. So you can set the thread wait time to say 1000ms which checks for your if statement every second and if it makes it into the statement you can lower the wait time by just changing the variable value. Wait(sleep) (Nopixel 3.5 Full Server)
CreateThread(function()
while true do
Wait(1)
inRange = false
local pos = GetEntityCoords(PlayerPedId())
if #(pos - vector3(-829.11, 75.03, 52.73)) < 10.0 then
inRange = true
print('Im in range and the loop runs faster')
else
print('Im not in range so i run only onces every 2.5 seconds')
end
if not inRange then
Wait(2500)
end
end
end)
- If you have job specific loops, make sure they only apply to players with that job. There’s no reason for someone who is not a cop to be running a loop on their machine that does not apply to them
local function exampleJobLoop()
local job = QBCore.Functions.GetPlayerData().job.name
CreateThread(function()
while job == 'police' do
print('im a policeman!')
Wait(1)
end
end)
end
Security
- A surplus amount of security in a code is not a bad thing. Don’t be afraid to add in multiple if checks or create random variables to pass through your events
- Never do any type of transaction with the player regarding money or items on the client side of a resource
Event Handlers
- When setting variables inside your resource, handlers come in especially handy due to not needing to constantly run checks
-- These are client-side examples
local isLoggedIn = false
local PlayerData = {}
AddStateBagChangeHandler('isLoggedIn', nil, function(_, _, value) -- FiveM native method
if value then
isLoggedIn = true
PlayerData = QBCore.Functions.GetPlayerData()
else
isLoggedIn = false
PlayerData = {}
end
end)
AddEventHandler('QBCore:Client:OnPlayerLoaded', function() -- Don't use this with the native method
isLoggedIn = true
PlayerData = QBCore.Functions.GetPlayerData()
end)
RegisterNetEvent('QBCore:Client:OnPlayerUnload', function() -- Don't use this with the native method
isLoggedIn = false
PlayerData = {}
end)
RegisterNetEvent('QBCore:Client:OnJobUpdate', function(JobInfo)
PlayerData.job = JobInfo
end)
RegisterNetEvent('QBCore:Player:SetPlayerData', function(val)
PlayerData = val
end)
Miscellaneous Guides
Keymapping
What is Keymapping?
- Allows you to take a REGISTERED command, using the RegisterCommand native, and apply a key binding to it. So instead of having to type in the slash command in the chat, you can just press a single key and execute it. This does NOT work with
QBCore.Commands.Add.
Example
- RegisterKeyMapping(‘togglelocks’, ‘Toggle Vehicle Locks’, ‘keyboard’, ‘L’)
The purpose of this system is so that players can completely customize their experience on the server and not be subjected to hard-coded key binds.
- Open your pause menu in game
- Navigate to settings
- Select settings —> keybinds
- Select FiveM
- Find the command you want to change the key for and select it.
- Press the desired key you’d like and that’s it
Weapon License
/grantlicense [id] weapon for that player to be “granted” access in City Hall./revoke [id] [licenseType] to revoke a players ability to purchase a hard copy of the specified license. Revoking the license will not remove the hard copy from the players’ inventory if they have one, it will simply remove the ability for them to purchase a new one.qb-core/server/player.luaPlayerData.metadata["licences"] = PlayerData.metadata["licences"] ~= nil and PlayerData.metadata["licences"] or {["driver"] = true,["business"] = false,["weapon"] = false}["weapon"] = false to ["weapon"] = truerequiresLicense variable set to true. To restrict weapon sales to individuals with a weapons license see the example config below from qb-shops/config.lua [4] = {name = "weapon_pistol",price = 2500,amount = 5,info = {},type = "item",slot = 4,requiresLicense = true},Getting the Players
or _, player in ipairs(GetActivePlayers()) dolocal ped = GetPlayerPed(player)-- do stuffendfor _, player in pairs(QBCore.Functions.GetPlayers()) dolocal ped = GetPlayerPed(player)-- do stuffendlocal SpawnPoints = {vector4(-1327.479736328, -86.045326232910, 49.31, 52),vector4(-2075.888183593, -233.73908996580, 21.10, 52),vector4(-972.1781616210, -1530.9045410150, 4.890, 52),vector4(798.18426513672, -1799.8173828125, 29.33, 52),vector4(1247.0718994141, -344.65634155273, 69.08, 52),}QBCore.Functions.CreateCallback('qb-truckrobbery:server:spawntruck', function(source, cb)local coords = SpawnPoints[math.random(#SpawnPoints)]local CreateAutomobile = GetHashKey("CREATE_AUTOMOBILE")local truck = Citizen.InvokeNative(CreateAutomobile, GetHashKey('stockade'), coords, coords.w, true, false)while not DoesEntityExist(truck) doWait(25)endif DoesEntityExist(truck) thenlocal netId = NetworkGetNetworkIdFromEntity(truck)cb(netId)elsecb(0)endend)Database Connection
Installation
- Extract the contents of the archive to your resources folder.
- Start the resource near the top of your resources in your
server.cfg.
- If you have a lot of streamed assets, load them first to prevent timing out the connection.
Configuration
server.cfg. Reference the following for an idea of how to set your connection options. You must include one of the following lines, adjusted for your connection and database settings.set mysql_connection_string "mysql://root:12345@localhost/es_extended?charset=utf8mb4"set mysql_connection_string "user=root;database=es_extended;password=12345;charset=utf8mb4"set mysql_slow_query_warning 150set mysql_debug trueUsing the UI
mysql_ui convar set to true:set mysql_ui truecommand ace permission access, then you should be able to use the mysql command in game to open up the UI and see your query data.Visual Studio Code


- undefined-global
- err-nonstandard-symbol
- unknown-symbol


Shift + CTRL + F (varies by user if you’ve changed them)
Useful Links
A list of helpful links relevant to developing on FiveM!Setting up fxmanifest.lua https://docs.fivem.net/docs/scripting-reference/resource-manifest/resource-manifest/****JavaScript FiveM Scripting Guide https://docs.fivem.net/docs/scripting-manual/runtimes/javascript/****FiveM Input Map Keys: https://docs.fivem.net/docs/game-references/input-mapper-parameter-ids/keyboard/Introduction to resources: https://docs.fivem.net/docs/scripting-manual/introduction/introduction-to-resources/****Creating your first script in Lua: https://docs.fivem.net/docs/scripting-manual/introduction/creating-your-first-script/****Creating your first script in C#: https://docs.fivem.net/docs/scripting-manual/introduction/creating-your-first-script-csharp/****Creating your first script in JavaScript: https://docs.fivem.net/docs/scripting-manual/introduction/creating-your-first-script-javascript/****Resource manifest: https://docs.fivem.net/docs/scripting-reference/resource-manifest/resource-manifest****Game references ie, controls, keys, blips, markers, etc: https://docs.fivem.net/docs/game-references/****Full native list:https://docs.fivem.net/natives/